Sunday, July 29, 2012

PRIMER PRIMER PRIMER!

I have a verbal (well, written) gift for my fellow makeup addicts. As you already know well, primer is the key to long-lasting makeup that looks its best. And there are a TON of options out there. Not only is there a LARGE array of brands, but within those brands, are different types: ones for redness, ones for dry skin, ones for oily skin, and so on. There's so many out there and if you have difficult skin or have a brand you love (and money is not an option), by all means, stick with what you know. If, however, you're in the market for a new primer, are looking to try something new, or are tired of spending oh, I don't know, $15-$30 for like .5 oz of primer, I have something for you, my loves!

NYC (New York Color) Cosmetics Smooth Skin Perfecting Primer- $3.99

LOVE, LOVE, LOVE! I cannot say it enough! Not only is it super affordable and easy to find, since NYC is sold pretty much anywhere makeup is sold, but it kicks ass in value too! For example, e.l.f. cosmetics, which I also love, makes a primer ... that costs $6.00 (not too much more), but only gives you .49 oz .... NOT EVEN HALF AN OUNCE .. for almost double! And since NYC Cosmetics offers coupons, you can often get it even cheaper!

It's like a lotion consistency so it spreads really well and doesn't require you to literally empty half of it for one use. Once you rub it in though, it kind of turns to a gel-like consistency, much like many primers. Makeup smooths evenly over it and pores and minor flaws are faded.

It lasts as well as the high end primers and makeup stays set in place, not seeping into your pores. Your makeup will look exactly as it did when you left when using this primer. I am a huge fan and will definitely be repurchasing this item.

For the amount, being under $5.00 and easily found, and COUPONS ... it's a winner! Give it a try and let me know what you think! If you already use it, love it or hate it, let me know your thoughts and experiences!

Friday, July 27, 2012

Eyebrow Pencil

So eyebrow pencils are a difficult thing. Getting the right color to match, show up pigmented, not being too waxy or too runny that it just sweats right off are just a few issues that come along with trying to find the right one. Not to mention some are expensive, don't last long, or are hard to find. I've found ones that I love the color and intensity of, but they don't last. I've found ones that do all that and last, but are anywhere from $3.99 to $10.00 for a MAYBE 6 inch pencil that is gone in a blink, especially if used daily. I finally gave one a try I found at Walmart the other day and fell in love! It has the same matchablitiy (made up word, I know!) as my old fave pencil. I prefer to use "Taupe" colored eyebrow pencils unless someone has really dark or really light hair because it just matches everything. It the perfect "Taupe", has enough wax to it to keep the hairs in place, doesn't fade or sweat off, and best of all ... it's like a foot long eyebrow pencil! 
 
OH .. and did I mention it was $.99! Yes, 99 CENTS!

And it's from NYC cosmetics so it's sold just about everywhere! Walmart, Target, drug stores ... pretty much anywhere that drug store cosmetics are sold! And since it's anywhere from 1/3 to 1/10 of the price of some other drug store brand eyebrow pencils ... and you get about double the amount .. it's an unbeatable deal!

It's the NYC Cosmetics (New York Color) Classic Brow/Liner Pencil. I use "Taupe" as I mentioned, but it comes in a variety of colors: Jet Black, Dark Brown, Charcoal, In The Navy, Sable, White, and of course Taupe. If you visit the link above, it will take you to NYC's website for the pencil and you can click the link under the price that says "Where to Buy" and type in your zip and find local stores that carry it too!

So even if you have a product you love, give it a try! It's $.99 so it's not a big investment and who knows, you might just like it better!

Let me know what you think if you give it a try, have used it, or already love it like me!

Wednesday, July 25, 2012

A to Z .. of my makeup!

Hey gorgeous! I decided to do something a little different. I HATE HATE HATE pictures of myself without makeup on, first and foremost, so know I really love you! Anyway, I post pictures of looks and once posted a before and after of with and without makeup. Here's a little step-by-step picture story of me from no makeup, to concealer, to foundation, to powder, bronzer, and blush, to eyes, and finally to lips and the full look completed. If you have any questions about specific products, ask away in the comments or on Facebook.

No makeup
No makeup (again)


All the places I apply concealer after primer,
before foundation. I know, I look like I'm going
to war or something haha.

After concealer has been blended in.

Foundation, powder, blush, and bronzer on.

Eyes and eyebrows, clearly.


Full face, eyes, and lips


Again, this is just my beginning to end for doing my makeup so you can see the progression! Any questions on products or techniques, ask away!

Saturday, July 21, 2012

Subtle Saturdays!

Today is the last day of July's beauty week for my blog. I hope you've enjoyed the week and the topics I covered. If you have any questions and/or comments on any of the topics ask away. If you have any suggestions for specific topics for one or more of the days for August's beauty week, let me know! I'd love to hear from you! Comment or find me on Facebook.

Anyway, today is Saturday, which is SUBTLE SATURDAYS! This is a pretty broad day and will cover anything from relaxation, to soft and natural makeup looks, to tattoo coverage products. Basically, just taking the day to rejuvenate!


Subtle Saturdays (#1 July, 21, 2012)

Whether you're recovering from a night out last night or preparing for a night out tonight (or both if you're that lucky!), Saturday is a good time to relax. It's your first real day off after a week's worth of school, work, or both! AND, you don't have to go back tomorrow. (I know some people work different schedules, so take your "Saturday" where you can!)

Today's will be about general recovery, from the inside out. Whether you spent the night dancing, drinking, or whatever else out late, it was most likely coming off a long week of some sorts. So take today and just relax.

1. Drink LOTS of water. Water flushes out toxins and re-hydrates the body (including hair and skin!). Drinking water when you first get out of bed (a full 8 oz glass) before eating or drinking anything else releases toxins and kick starts your metabolism to give you a healthy start to the day.

2. I hope I don't need to say this and it's already done, but if not: WASH THAT MAKEUP OFF! Sleeping in makeup is a no, no! Sure, we've all done it, but it's not good. Your skin goes through natural cycles during your sleep cycles. That's why they make face creams and treatments specifically for nighttime so they can be absorbed correctly. If you still have makeup on, then that's what your pores are drinking in! Besides, do you really want last night's glittery, black shadow and fake lashes all over your nice pillows?

3. Do something for you. Whether you have the money or want to stay home, give yourself a mani/pedi! Recreate it at home or search your local nail salons online and find coupons. Look into local cosmetology schools that offer discounted services and see if they have Saturday hours or make an appointment for your lunch hour one day this week.

4. Try a natural look. Apply a tinted moisturizer and mascara for a soft, subtle day look. Or apply your full face, with a soft, subtle eye. like a neutral, smokey daytime eye. Then, you can easily add more shadow and intensify the look of the smokey eye, add a darker shadow in your outer corner, or add/thicken your liner for a more dramatic look. Apply more coats of mascara or add fake lashes.

5. Take some free time to read a book, catch up on some TV shows, or just take a nap. Take some "you" time and enjoy your day!


I hope you all enjoyed this week and look forward to next month's beauty week! Thank you for reading my posts, staying involved in the little tidbits of my life (like Zoe and cosmetology school). Lots of love!

Friday, July 20, 2012

Fierce Fridays!

TGIF! It's Friday ... a.k.a. date night, girl's night, basically just a night out after a long week! I know you're breaking the heels out, wearing something low cut, and pulling out the jewelry. Obviously you're going to do your hair, but sexy straight or seductive waves? What about makeup? Nude eyes and a hot lip or sexy eyes and a subtle lip? Well in this blog's beauty week each month, Fridays are FIERCE FRIDAYS! This Fierce Friday look is going for a sexy eye and a softer lip, but not nude! I wanted to make sure I got this post out early enough in case any of my party girls needed some inspiration for tonight! So here you are, have fun, stay safe, don't leave your drink alone and all those other things ... but go crazy and look sexy while you do:

Fierce Fridays (#1 July 20, 2012)

- As with every makeup look: prime, conceal, blend, finish, blush/bronze ...

Eyes:

- Prime your lids with MAC Paint Pot in "Painterly" from lash line to brow.
- Apply smashbox cream eyeliner in "LAVA" (a shimmery, gunmetal color) to your eye lid from lash line to the crease, using either your ring finger or a flat eye shadow or a concealer brush. (Layer this until you achieve desired pigment)
- Next, take NYX roll on shimmer (for eyes, face, and body) in "Purple" (RES09), and roll it on to the back of your hand. Roll it around a decent amount to have a good amount of color on your hand to work with. Using an eye shadow brush, pick up some of the purple color and apply it over top of the cream eyeliner you applied to your lid. Work this color up into the crease. As with step 2, reapply and layer this color until you achieve both the coverage and pigment you want.
- Take MAC eye shadow in "Naked Lunch" (frost) using a smaller eye shadow brush and apply it to your brow bone and inner corner. This blends the look, highlights the brow bone, and lightens the inner corner of your eyes.
- Apply a black eyeliner to your lower waterline. If you'd like a more dramatic look you can apply a thicker black line using a cream liner and brush to your upper lash line and make a winged look for more seductive, nighttime eyes.
- Finish up with mascara. Apply a few coats to get good coverage, length, and volume.
- Fill in and shape your brows using NYX eye liner/brow pencil. In the following pictures, I used "Taupe", which is really versatile, from red-heads to blondes to brunettes. (White or light, light blondes and black hair should match the color as close as possible to the natural brow hair color.)

Lips:

- As always, when your primed your face, you apply a lip conditioner. This makes any makeup residue that got on your lips easy to wipe off, kept them moisturized, and will help remove any dead skin.
- To get the color I wanted, I applied two different lip colors. I used NYX Xtreme Lip Cream in "Natural" and "Dolly Girl". "Natural" is a nude, pink shade and "Dolly Girl" is a vibrant hot pink, almost fushia shade.
- I wipe off any remaining lip conditioner, therefore removing makeup residue and dead skin.
- I next applied the "Natural" shade to my entire lip using the applicator.
- I then take "Dolly Girl" and use the very end tip of the applicator and apply this color around the edge of my lips, almost like a thick lip liner. I do this on both my upper and lower lips. Then I rub my lips together, like I'm blending out a lipstick. This leaves the color sort of blotchy.
- Take your ring finger and gently dab around your lips.Start with your upper lip and finish at the bottom. Your upper lip is typically smaller so the color generally ends up concentrated there and softer on your lower lip so if you blend the top out first, you'll carry some of the color to your lower lip. You're left with a gorgeous pink shade that compliments the eyes without competing wit them!

And voila, you're gorgeous and fierce just in time for Fierce Friday!


Thursday, July 19, 2012

Teaching Thursdays!

Hello, gorgeous! Today is TEACHING THURSDAY! This day will be teaching a general topic and/or technique in beauty! Product usage, contouring, and specific eye and lip looks are all topics I've received questions about. One Thursday out of the month, during beauty week, I'll cover a topic like that. If there is anything you're specifically interested in, comment or Facebook me any questions and I'd be happy to help!


TEACHING THURSDAYS! (#1 July 19, 2012)


On the first Teaching Thursday, I'm going to cover some specific contouring which can be used daily or for special events. It can certainly be used year round, but as it is summertime, now is a great time to use it. From bathing suits to sun dresses, and anywhere in between and beyond, this tip can be helpful so here it is: collarbone contouring!


Some of us have more pronounced collarbones that may not need assistance and some of us have a normal collarbone. Some people's aren't very noticeable so whether you need a little help or a lot to make yours stand out and look sexy, read on!


To make your collarbone stand out and look sexy and irresistible ...


1. First of all stand in front of the mirror without a shirt on (or wear a strapless shirt and/or bra) while you do this so you don't get any makeup on your clothes or sexy lingerie.


2. Next, and before you begin, basically shrug your shoulders. Lift them up and forward, while bringing your chin in, and leave them there for a minute. You'll see when you do this the actual collarbone stands out and the grooves dip in, making your collarbone look more pronounced. These are the lines you'll want to follow.


3. For this to be effective, you'll need a bronzer (not too deeply colored so it looks fake, just darker than your natural skin tone). You'll also need a highlighter with shimmer (not glitter or sparkle unless you want to look like you're going clubbing).


4. Take a bronzer brush (or a powder brush will work) and shrug those shoulders back up. Get a good amount of bronzer on the brush and apply in a circular motion to the dips in your collarbone area. There will be a dip on either side of your neck and in the dead center under your chin basically. This will give the appearance of these dips sinking in constantly, not just when you're shrugging. Release your shoulders and see what you think; you can always add more once you apply the highlighter if you think they need to be more pronounced.


5. Re-shrug gorgeous! Now on your actual collarbone, the bones that raise out when you shrug your shoulders while lifting them up and forward and bringing your chin in (like you're trying to make a double chin almost), you're going to apply highlighter. Use a smaller powder brush or even a blush brush to make sure you just bring out the bone and nothing else. Run the highlighter along your collarbone (the actual bone only) on both sides of your neck. 


6. Bring your shoulders back down and take a look. If you want them to stand out more, simply add more dark color to the dips and light, shimmery color to the bones. If you want a really dramatic look, you can try using a slightly darker colored bronzer and a slightly lighter colored highlighter, but you don't want it to be too drastic or the actual makeup will stand out and look fake.


And there you have it: a sexy collarbone making every summer outfit look even better on!


And just because I love you, and to complete the look, contour your chest!!!


Get the bra you're going to wear on. That way your chest will be how it's going to be once you're dressed.


1. Take the bronzer and run it in your cleavage. Begin from the bottom of your breast, work the bronzer around your breast, and around the top of it. This creates the shape and definition of your breast. Now do this to either side of your chest.


2. Now take the highlighter and apply it to your actual breast. Only apply it to what is out of your bra already and don't go into the bronzed portions.


*As with collarbone defining, you can always add more bronzer and more highlighter for a more defined look!*


So there you have it, whether a low cut tank top, dress, or bathing suit, your neck to your chest, will be sexy and irresistible! Enjoy it, loves!

Wednesday, July 18, 2012

Wellness Wednesdays!

Happy Wednesday and I apologize for the delay since it's already 10 pm! At least these tips will be for more than just today and can be used all summer, and all year long! I have some happy and exciting news for my lovely blog readers to explain why my post is oh so late this evening!


Today was my follow up visit at the cosmetology school to pay the enrollment fee, sign a whole bunch of paperwork, and discuss my financial aid package. As a new mommy with my angel daughter, money is TIGHT to say the least. Therefore, I needed federal grants and student loans to cover the tuition. You have 6 months from the day you complete school (or stop going for drop-outs!) before you have to start making monthly payments. So as long as all my tuition, taxes, fees, and kit were covered, I'd be good to go! Well, loves, I AM GOOD TO GO! I just have to have my FAFSA verified and then attend orientation on Sept. 4th and they I officially begin September 10th! It's a 42 week program, or 1260 hours and then I will finally be a licensed cosmetologist! YAYAYAYAAYY! hahaha I just had to share my excitement with you!


Anyway, as promised today is day 4 in my blog beauty week and therefore a new topic of discussion. As you can clearly see from the title Wednesdays are Wellness Wednesdays, basically all types of fun facts, tips, and suggestions for wellness, relaxation, and overall good health. Beauty starts from the inside out and if you don't feel well, you are NOT looking your best! So let's help you feel better and look better!


Wellness Wednesdays (#1 July 18, 2012)


I have to begin by crediting First for women magazine for these tips from their July 30. 2012 issue! This magazine offers so much from beauty tips to health care tips and interesting stories and ideas for seasonal meals and decorations! I LOVE IT! Anyway, I compiled a little list of a few tidbits I gathered from reading it that I wanted to share, especially with today being Wellness Wednesday, so here you go, loves:


- You can't read a magazine, listen to the weather, or pass a summer time ad that isn't promoting sunscreen and for good reason. People are finally aware of how important it is because of skin cancer. You apply it from head to toe, even just under your swim suit in case you move and some unprotected skin sneaks out, right? What about your hair line and your part? You work so hard to get those beachy waves or straighten it and add hair spray and products to keep it perfect so obviously you don't want to apply a thick, oily cream or wear a hat and ruin all your hard work. First magazine says "Run a stick of lip balm with SPF along your part and hairline." You get the protection you need without messing your hair! I just had to share :)


- Try your hardest and can't lose weight? Did you buy that 2 sizes too small bikini in like March to convince yourself you'd work harder just to fit into it? Here's why despite your hardest efforts, you may still not be succeeding. According to First magazine, "For 75% of women with excess pounds, fat buildup in the liver is making it nearly impossible to slim." They also say "If you avoid only one thing, make it ... High-fructose corn syrup ... because it basically starts a fat-production factory in the liver. This man-made sugar can contain 55 to 65 percent fructose, a type of sugar that goes straight from the bloodstream to the liver, where it's quickly converted into liver fat." Many commercials and ads today claim that it's fine and just an inexpensive sugar and if eaten in moderation won't make a difference. Thing is, it's in SO many foods and drinks now that we get WAY too much of it. And if all it does is run to your liver, make your liver fatty, and therefore make it damn near impossible to lose the weight after, I'll go without it, thanks!


- Poison ivy and bug bites are an inevitable part of summer. Unless you work 80 hours a week or don't go outside, most places you go will give you one or the other. After dinner walks, bug bites, After dinner walks in the woods, bug bites and poison ivy. Beach ... bug bites. Running around in the yard ... poison ivy. First magazine gives you some quick, home remedies. Vinegar can help heal poison ivy. "Urushiol, the rash causing oil in poison ivy, is incredibly tough to get off your skin. The Rx: apple cider vinegar. Soak a cloth in the liquid and press onto skin for 2 minutes to break down the oil, then wash with a grease-fighting dish detergent to lift it off your skin." Salt can ease the itch from bug bites. "Salt ... helps break down the inflammatory proteins your body produces in response to bites, plus destroys germs trying to sneak in through damaged skin. Simply dampen 1/4 tsp. of salt with a drop or two of water and gently rub over the bites with your fingers until you feel the itching ease."


- Ever find the heat and sweat that accompanies summer nights, hell even walking to and from your car to go to work, melting your lipstick? Smudging, running, and melting are all side effects of heat and wearing lipstick. And if you wear something noticeable, hot pink or red, your upper lip and sides of your mouth are now dyed and it looks like you forgot how to apply makeup. First magazine recommends that you "run an ice cube over your mouth right after applying your favorite shade. The ice will set the color and prevent it from feathering, bleeding, or melting in summer's heat."


- Last, but not least: Why is my bikini area so dark? This tends to be worse for waxers than shavers, but after grooming your lady parts and then heading outside in a bathing suit, sometimes your bikini line gets dark, which isn't so cute. First magazine says, "Waxing removes the top layer of skin, leaving the freshly exposed dermis more vulnerable to the sun (and self tanners). ... Waxing professionals recommend waiting 24 hours after hair removal before going out in the sun to give the skin time to heal. When you do head out, apply a sweat-resistant sunscreen with SPF 50 to protect this delicate area and reapply every hour. To lighten already darkened skin, try soaking a washcloth in soy milk and apply it to the area for 30 minutes. The milk's protease inhibitors halt the production of melanin, the pigment responsible for skin color."


Again all the above tips were from First for women magazine. Visit them online and subscribe today; you'll love it!

Tuesday, July 17, 2012

Truth Tuesdays!

Hey loves! Happy Tuesday! Today is the 3rd day of my blog beauty week and it is TRUTH TUESDAY! This day will, just like the others, be a part of one week out of each month where each day is dedicated to a specific blog post. Tuesdays will be all about telling the truth! Most products I tell you about are products I've loved and continue to use because they've worked for me. Now, one day out of the month (at least anyway) I'll tell you about something I just can't stand. Whether it simply didn't work, is crazy expensive for the value, or just overall sucks, today is the day you'll hear my mini rant on it, so here yah go:

Truth Tuesdays (#1 July 17, 2012)

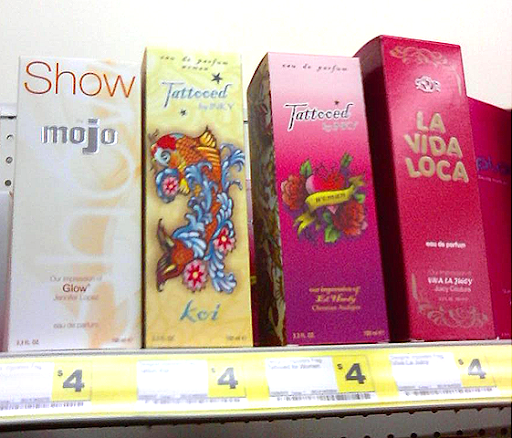
Ever been to a dollar store, discount store, or drug store and seen bottles of fragrances that look similar to popular, designer fragrances, but are super cheap? Ever wonder if it's the same scent bottled cheaply and you can get a killer deal? I obviously haven't tried every single one out there, but I've tried my fair share. Guess what? THEY SUCK. No deal to be found. They are made in crappy bottles, sometimes plastic and sometimes glass with the worst spray nozzle ever. Some are in hair spray type containers and spray as a scent mist. Victoria's Secret offers this with some of their fragrances and sometimes even have sparkle to them and their's are great! Those discount ones? THUMBS DOWN!

- They are bottled horribly. The bottles are simple, ugly, and unappealing. Sometimes the spray nozzle doesn't work, or is even missing once you get the box home and open it.

- While you may be willing to forgo "cuteness" and style to save a great deal of money since the average bottles of perfume in department stores, depending on size and brands, can range from $55 all the way, well into $100 and up, you aren't only skimping on the look. The scents are cheaply made as well. They open with a heavy alcohol smell and generally fade away to nothing. If you're lucky they fade away to nothing instead of gluing a horrific knock-off, nauseating scent to your skin and clothes.

- They design the boxes and create the names of these fragrances to emulate the high end perfumes they are trying to imitate. This often happens with Ed Hardy, Britney Spears, Mariah Carey, and similar ones. This to me is really kind of unfair marketing. I take no issue when it says on the box "Similar to such and such perfume". That lets you know what it's like. But when you design the box to look just like the designer one and the name is just a word or so off, that can trick people. Young girls, older women, people who aren't so fragrance savvy, can find themselves stocking up on these amazing deals that once they get home, SUCK! And if you buy them at the dollar store, you're basically screwed. They do not accept returns; they only offer exchanges and you have to have your receipt. So if you went ahead and bought 20 fragrances as party favors, go home and smell it and hate it, you now have to find that dollar store receipt (because we really hang on to those) and go back to the store, wait for a manager and find another 20 items to essentially trade for.

While it's a cute idea for little girls to wear fragrances like mommy without spending a lot or letting your 3 year old run through your bottle of Dolce & Gabbana, the average person will just end up wasting a few dollars on an ugly bottle that will only take up room collecting dust in your closet.

Knock offs (the two on the far right "Tattooed" and "La Vida Loca" immitate the two below)
You can see how the colors, fonts, designs, and labels closely immitate the designer bottles, which can obviously cause confusion!


Monday, July 16, 2012

Mascara Mondays!

Hey loves! Here's the second post, Monday's post, for this month's week of beauty! Today, being Monday, is MASCARA MONDAY! One Monday a month I will review a mascara that I love and/or a mascara I didn't love all that much. Today, I will be reviewing the mascara I've been using lately and the one you've seen in all the pictures of looks I've taken lately. So here goes:


Mascara Mondays (#1 July 16, 2012)


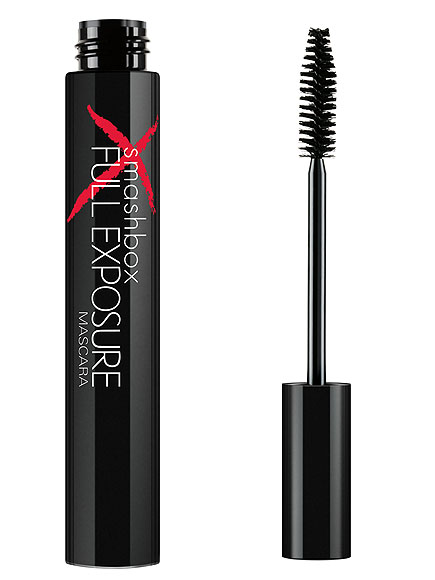
This first mascara I'm going to discuss is smashbox Full Exposure mascara in "Jet Black". I got this as part of a kit I purchased from the smashbox counter in Nordstrom.


PROS:


- The color lives up to its name. Its a true, genuine black color.


- The mascara really wraps around your lashes, coating them pretty well, adding both length and volume.


- The wand is fuller in comparison to some, but it's still easily usable and workable.


CONS:


- The mascara sometimes runs a little if you sweat, have watery eyes, or tear even, but it doesn't pour down your face. It gives that "raccoon eye" look.


- The mascara really requires an eye makeup remover to entirely remove it. Regular face wash or face makeup removers or makeup remover wipes don't work very well and you'll end up using a few wipes, leaving your eyes red and uncomfortable.


- While I got it as part of a kit that was a great deal, the mascara alone costs $19.00. In the world of department store mascaras, that's average to inexpensive. And while I love A LOT of department store makeup, certain things just aren't worth the money. I've found plenty of mascaras at the drug store for under $10.00 that work just as well and are even easier to remove; therefore, taking away the cost of an additional product: eye makeup remover.


- This mascara does provide a great look, but it takes multiple coats to get the right look. For me, I generally need about 3 coats to get the look I'm going for. However, it is a faster drying mascara and if you don't apply and reapply coats quickly, you'll end up applying wet mascara on top of dry mascara, which can cause flaking into your eye.


- The tip of the mascara wand gets smaller to help you reach the inner corner, which is great. However, the tip gathers clumps of the mascara so as you're applying the mascara to your lashes, you sometimes might find a little getting onto your brow bone if you're not careful.


Basically, the mascara certainly isn't bad, but for the price, I'd only use this if it comes in a kit or a free gift. There are plenty of other great mascaras out there, so check back for reviews and keep your eye out on the Facebook page when new posts are up. Also, don't forget that one week a month, there will be daily reviews or suggestions Sunday-Saturday with themed daily posts!


If you've tried this mascara and agree or even disagree, I'd love to hear your thoughts and opinions on it! Lots of love, gorgeous!

Sunday, July 15, 2012

Seasonal Sundays!

Hey there; Happy Sunday! If you're a fan of my Facebook page, then you knew there was a new post coming today with something new for the blog! So here it is: Once a month, for one week (Sunday through Saturday) there are going to be daily posts with something specific for the day. So for example, today is Sunday. Sundays are Seasonal Sundays. Once a month on a Sunday, I'll write and post about a seasonal look or a beauty regimen good for the season we're in. Then that same week, on Monday, there'll be a specific post for Mondays (one Monday a month). I know that may be a little rambley, but I wanted to fully explain it. Today's post is "Seasonal Sundays" and the next one will be a Sunday in August. *Remember to check back daily this week as there will be a new post daily until Saturday!*

Seasonal Sundays (#1 July 15, 2012)

This is a look that is fun and summery. I've posted a similar look before, but this one I feel is perfect for a middle of the summer night out or even a day time look. It's noticeable and sexy, but fun and flirty so it can be worn day or night and could always be made more dramatic (thicker liner, winged tip, deeper color added in outer corner for more depth), or made more natural (brown liner instead of black, or forgo liner and only do mascara). Anyway, here's the look:

- Apply a full face of makeup (prime, conceal, blend, set)
- Apply bronzer to the entire face for a summery glow by applying it like a "3" to either side of your face.          
            Gently run the brush through the color and begin in the center of your forehead. Work the color our
            around your eye and come back in on your cheek bone, then out again around your mouth and come
            back in to the middle of your chin. Repeat on the other side and then run down the center of your
            nose. This method ensures you get the bronzer spread evenly so you don't look fake and that the
            color is only on the areas the sun would hit and tan you naturally!
- Apply blush (in a pinky peach tone) to your cheeks
- Prime your eye lids (I used/always use MAC Paint Pot in "Painterly"
- Begin by applying a matte, nude shade to your entire eye lid. I used MAC eye shadow in "Brule"
- Then I used the NYX eye shadow trio in "Shangri-La", which is yellow, orange, and peach shadows.
            - I apply the peach shade (far right) to my eye lid from lash line to crease.
            - I then apply the orange shade to my crease, blending outward and upward slightly. I also work it    
              into my outer corner.
           - Lastly, I apply the yellow shade as a highlight to my inner corner and brow bone.
- I applied a cream eyeliner in black (mine was from e.l.f.) using a flat eyeliner brush to my lash line.
- I took a pencil eyeliner in black and applied it to the inside of my lower waterline.
- I wrapped up the look with some black mascara on top & bottom lashes and filled in my brows using an  
  eyeliner/brow pencil from NYX in "Taupe".
- To keep the look seasonal and soft, I applied a tangerine lip gloss for a sheer wash of color. (Peach,
  tangerine, or coral would all work too)

Feel free to create this look using your own shadows you already have or something similar. I think a burnt orange would also be pretty to add to this look in the outer corner to add depth to make this look more nighttime friendly or to go from summer to fall! Anyway, play with your colors and leave comments and send pictures of your own looks! Don't forget to "Like" me on Facebook for more pictures and so we can interact even more at: FacEscapes by Tina.


Wednesday, July 11, 2012

A little personal ...

Hey love! I don't usually write blog posts that are primarily personal. I incorporate my experiences with products and occasionally give a background of what is going on in my life, like things with my husband and daughter when I feel like it's relevant.

This post really is just a little update on me. I've entertained going to cosmetology school since I was 16 and have looked into it, toured multiple schools, and even went as far to apply and look into the financial aid process. Up until this past year, I was legally considered a dependent when it came to filing taxes since I lived at home more than 6 months out of the year. This past tax filing season (for 2011's tax returns) I was finally able to file as an independent since I lived on my own and paid my own way and was married and had a baby. Now, when I'd go to apply for financial aid for cosmetology school, I'd qualify for more assistance since I make a good deal less than my parents do (obviously).

So anyway .. tomorrow (July 12, 2012) I'm going to a local cosmetology school and meeting with an admissions adviser. I'm going to tour the school, discuss enrollment dates, and begin the financial aid process. If all goes well and between saving, grants, and student/federal loans the tuition will be handled, I'll finally be getting to cosmetology school!

I've spent my life knowing only one thing for sure: I wanted to be a mom. I never truly found hobbies and from 14 years old on, focused on dating and relationships and never found myself and what makes me me. Luckily before I met my husband, I took the time to genuinely discover who I am. And I knew two things for sure: I still wanted to be a mom and that whether hair, skin, makeup, nails ... whatever, I wanted to help people create the most beautiful them. My daughter is my world and my life and brings me more happiness than I could ever describe, but I finally learned what could make me "tick" and that was cosmetology.

I know some of you may not want to read this post because it's not informative and it's not all that relevant to your lives, but I just wanted to share my happiness with my blog readers today that tomorrow the other half of my dream for my life is beginning. All of your views and comments have really encouraged me to believe this is the right thing for me and that doing this type of work in any capacity, even blogging :), is helping others so thank you for teaching me that.

All my love,
Tina

Monday, July 9, 2012

Something A Little Different .. Perfume!

My reviews and posts are generally on makeup or skin care and sometimes hair care. I never really mention or review perfumes I've tried and love or tried and hate. While there are a TON I really can't stand, I have been wearing one a lot lately that I love! I've had it for like a year and a half now and completely forgot about it, but as I was cleaning my closet out that contains all of my lady gear (the good kind lol .. makeup, hair stuff, perfume apparently haha) and found it and I fell back in love!

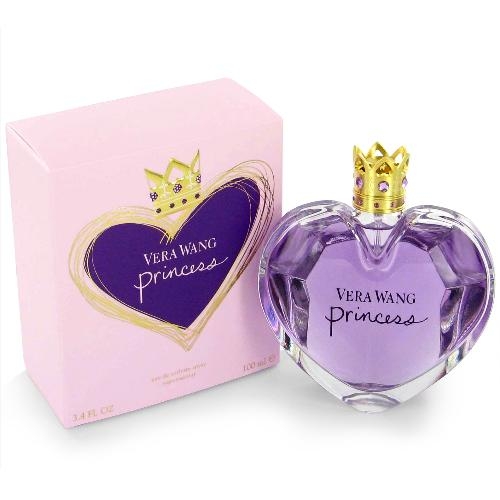
My perfume of right now is: Vera Wang "Princess". I have it in a typical spray bottle and a roll on fragrance, which is always the way to go. This perfume has amazing stay power and lasts almost all day long, even if you sweat or are moving around, but I love a fragrance on the go. Roll on perfumes can tuck easily into purses and evening bags ... even your jean pockets!

This perfume:

1. Smells great .. obviously. Why else would I love it? But really though, it just has the warm, feminine scent that doesn't smell too young or too elderly, it doesn't have that teenage trying-too-hard scent, and it just is really pretty. It's not floral or clean/fresh, but not quite a musk in my opinion. It's almost like Warm Vanilla Sugar's warmth, without the wanting to vomit from sweetness. (Amazing description right? Vera Wang should just be knocking down my door to write the reviews on her fragrances hahaha) But honestly, it's the most down to earth, legit way I can describe it. Typical scent words "Musky", "Floral", "Clean" do evoke an idea of it, but floral can vary widely from a hint of femininity to catch in your throat, gagging, field of flowers where is my Zyrtec?

2. Adorable packaging. The full sized bottle is in the shape of a heart and is tinted purple. The cap is gold and the lid is a gold crown with jewels on it that just surrounds the nozzle. Super cute. The roll on fragrance is a decently large (in length) stick that is clear with a hint of purple as well. It has gold, hand drawn looking hearts over the entire bottle and in the center says VERA WANG and under it says "princess" in the cutest script font.

3. The scent actually lasts. You don't have to bathe in it to smell it so it actually lasts more than a month, even being worn daily. You don't often need to reapply so if you get the gift set around a holiday and end up with the bottle and roll on fragrance, you really end up with 2 perfumes.

4. The boys love it. It's not too strong, or girly. It's soft and subtle and feminine ... all the good things you want a woman's fragrance to evoke, but it's got something to it. Something like an undertone I guess. It's like dark, seductive. Like when you first smell it, it's sweet and lady like, but on the back end it's like naughty hahaha. Like you know the woman wearing it, has another side. I'm going to say it ... Vera Wang's Princess makes me think of "lady in the streets, but a freak in the sheets". hahahahaha Anyway, it's just a sexy fragrance so give it a whirl! It'll make you feel seductive and your man will not mind!

Vera Wang Princess Perfume - 3.4 oz *NEW in BOX* - $30.00!! :  wedding Vera Wang Perfume

Saturday Night Out ...

Call the babysitter because us mama's need to get dolled up and be a woman sometimes! I asked what your go to look for Saturday night out is and I'd love to hear more and see more pictures on Facebook, but here is mine from this past Saturday night (July 7, 2012)!

I wasn't sure what I wanted to do so I looked over some pictures other makeup groups post and decided to do my own version of a seductive, primarily deeply black shadow look that I saw. It turned out pretty damn near close to the picture I saw and what I wanted, considering my eye shape was different than that of the girl in the picture. Anyway, here's the look!

Eyes: Black, Smokey, Seductive

1. Apply MAC Paint Pot in "Painterly" to the entire lid from lash line to the brow.
2. Next I applied a cream eye liner from smashbox in "Lava", which is a deep, smokey, shimmery gunmetal that can also be worn as a cream shadow. I applied this from my lash line to my crease using a flat shadow brush and reapplied to desired pigment.
3. Then I took my L.A. Colors eye shadow trio in "Lily", which is a traditional smokey eye trio (white, silver, black), and used the darkest color, black, on top of the cream shadow/liner "Lava". I also continued reapplying this color until I got the depth and pigment I wanted.
4. The girl in the picture I was trying to recreate didn't have a traditional white or off white shadow on her brow bone or inner corner so I recreated with a few colors what she had on. I took "Naked Lunch" and "Goldmine" shadows from MAC on the brush together and applied them to my brow bone and inner corner.
5. I then took just the "Goldmine" shade and applied it directly under the brow, as it appeared to have a golden tone in the look I was trying to recreate.
6. I noticed in the look the girl didn't appear to have eye liner on, but to make sure my lash line looked fluid with the rest of the look, I took the thin end of the eye shadow brush and swept the black color on the upper lash line, around the outer corner, and under the lower lash line. I did also apply a black eyeliner pencil to the lower water line. I applied mascara and filled in my brows and my eyes were set!


Cheeks: Sexy, Subtle Pink

After contouring my cheek bones using bronzer, I applied "Twinkle Pink" blush from e.l.f. cosmetics (the dupe for Nars' blush I wrote about before) to my cheeks.

Lips: Soft Pink

1. As always, my lips were primed and prepped with a lip conditioner.
2. I then applied my lipstick "Angel" from MAC, which is a really pretty, softer pink.
3. I applied MAC's Lipglass in "Cultured" on top for a soft, sweet pink lip to be noticeable since I was going out, but to not fight with the deep, dark eye look. *As a general rule, just do one. Lips or eyes get the va va voom focus and the other gets a complimentary look!*


Fireworks Fierce ... 4th of July Makeup!

Happy belated 4th of July! I hope everyone had a fun, safe midweek celebration! It felt so weird for the 4th to fall on a Wednesday to me. I mean obviously it changes every year, but I feel like it's always a Sunday or a Monday for some weird reason. Anyway, besides the point, my family and I had a wonderful day on the beach! We took little Miss Zoe for her first real beach trip and she swam in the pool, played in the sand, and tried out the ocean! After a much needed nap (while Mommy got ready), we headed out on the beach for some fireworks and Wildwood did a great job! Zoe just loved them and didn't cry once; I was so proud! Anyway, enough about my fun filled day .. and on to the makeup!

I wasn't sure what look I wanted for sure. I debated soft, subtle eyes and a red lip, blue eyes and a nude lip, or going all out (since it's a holiday and all) and rocking the blue eyes and red lips. Well I forgot (fail!) my red lip stick, gloss .. pretty much anything red .... so blue eyes and a softer lip it was!

Here goes: Fireworks Fierce

Eyes: Blue and White

1. I prime the eye lids (as always) with MAC Paint Pot in "Painterly" from lash line to the brow.
2. Next I applied the lightest shade (top left corner) from the palette "Eye Candy" from L.A. Colors on the entire eye lid.
3. I then took "Irises" from NYX cosmetics, which is a brighter true blue (4th of July blue basically) and applied it on the lid from lash line to the crease. I also worked it up slightly into the crease somewhat fading out. I took a flat eye shadow brush and reapplied the color repeatedly until I got the desired pigment I wanted.
4. I then took the darkest shade (blue in the bottom right corner) of "Eye Candy" from L.A. Colors and applied that in the crease and outer corner.
5. Next, I combined "Crystal Avalanche" and "Naked Lunch" eye shadows from MAC cosmetics with the lightest shade from "Eye Candy" that I originally used over my entire lid and applied those 3 colors to my brow bone and inner corner.
6. I then applied cream eye liner in black to my lash line and a black eyeliner pencil to my lower waterline and finished off with mascara. And of course, I filled in my brows using "Taupe" eye liner/brow pencil from NYX cosmetics.


Lips: Soft Nude Pink


1. I always prep my lips with lip conditioner when I first prime my face before any makeup goes on so when I'm ready to do my lips, they are soft and all dry skin can be wiped off easily with a tissue.
2. Then I applied "Natural Nymph" lipstick from e.l.f. cosmetics.
3. Next, I applied "Cultured" gloss from MAC cosmetics from their Tinted Lipglass line


Then ... ta da! You're 4th of July set!


Mommy & Zoe (6 mths old already!) on the beach for 4th of July 2012!


Saturday, July 7, 2012

Cream Compact Foundation

I generally prefer liquid foundations personally for my makeup because I like their coverage and application. However, sometimes when you're short on time, need a touch-up, or just don't feel like doing your makeup up, a cream compact can be a great choice. There's a bunch out there from drug store brands to department store brands and they range drastically in quality and price.

My first one that I really loved was MAC cosmetics' cream compact Studio Tech. It gave a nice, build-able coverage that looked great in pictures and lasted throughout the day. However, at $30.00, it was just a little out of my personal budget for consistent use. In the scheme of department store makeup, $30.00 foundation is certainly not that bad, but I need a little more than the average person to cover up my redness so it doesn't last me very long. I continued to use it and replace it for awhile, but I was searching for a comparable product in quality, at a lower cost.

Finally, I found it! Ulta's Fabulous Face Compact Foundation is just amazing! It doesn't come in the same eye appealing packaging as MAC's, but the quality of the actual product is well worth looking past that. The compact has a clear lid so you can see the color and the amount left without opening it and in my opinion, this compact closes better and keeps the actual foundation more fresh and prevents drying better than the MAC packaging. The part holding the foundation lifts up to reveal a mirror on the other side and a round sponge applicator underneath. The sponge is of surprisingly high quality and doesn't flake or fall apart after continued use. I generally prefer foundation brushes (as my readers know well), but sometimes the sponge is necessary, like in the car or for quick touch-ups.


The actual foundation is a great formula with build-able coverage. It has a decently liquid formula, but isn't runny and doesn't "melt off" your face. It provides great coverage and lasts all day when worn under a finishing powder. The only real downside I've found, is that this foundation only comes in 6 shades, which of course can make the MAC foundation a little more appealing to those with very light or very dark complexions. However, the colors are rather forgiving and the makeup is very blend-able so the average person will be able to find one that works.

Also, another great bonus to this foundation is that it's Ulta's brand. It is often lately on sales like 2 for $10 or  2 for $12, like the recent sales Ulta has been having, which is a phenomenal deal considering the compact is $12 when full priced. When I purchased mine, I got two for the price of one. Ulta also offers coupons like $3.50 off $10 or 20% off one item, so if you time your purchase right, you can really get a great deal. Even at full price, it's still a great deal.

The choice is up to you. I know many MAC makeup wearers are very loyal and especially wouldn't consider an "off brand" product and that many people can afford the $30.00 foundation, but if finances are an issue and you don't mind trying a new brand, give it a go! It's certainly not a huge investment, and you may just be surprised!