***TODAY'S POST IS THE 100TH POST!!!***
Happy Thursday! We are officially in the end half of the week and I hope you're enjoying yours so far! I hope you are all finding September's Beauty Week interesting, helpful, and informative ... and of course FUN! Anyway, here is Teaching Thursday!
Teaching Thursday (#3 September 13, 2012)
Today's teaching post is about a great, artistic, new nail polish trend: Ombre Nails! It's that two-tone nail polish look where one color fades into another. It looks somewhat difficult right? Like maybe I need lots and lots of practice to do that? Nope! It's really simple. All you need is 2 color polishes and a top coat.
- When picking your two colors, you'll first need to decide the look you're going for. For subtlety, you'll need two colors that compliment each other or for a more bold, dramatic look, try two colors that would otherwise be "opposite" or clash.
- You'll also need a sponge. A makeup applicator wedge sponge is perfect for this. You should also keep near by a tooth pick and a protective cover (newspaper, magazine, foil, etc.) since this gets a little messy!
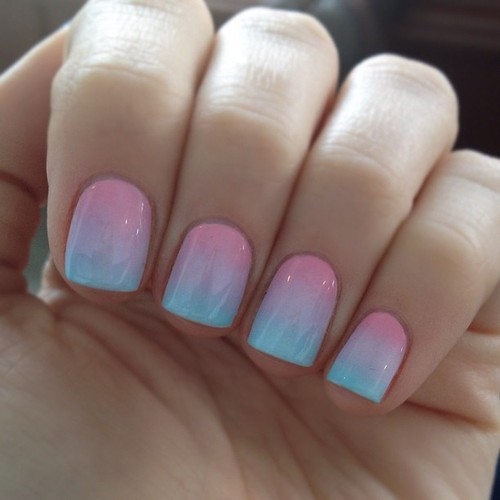 |
| Picture from StyleCaster |
*Next: On a flat surface (ideally on foil or wax paper), paint a good amount of each color right next to each other. Make sure they touch.
*Then: Use your tooth pick to swirl the colors together where they met. The area which you swirl it will determine the length of the graduation of color. Long graduation=bigger section mixed; less fade=mix only slightly.
*Now: Take your sponge and dab it directly over the swirled nail polish a few times. Dab the sponge directly on your nail, with the lighter colored side (your base color) closest to your cuticle. Continue to dab it lightly and move very slightly up and down the nail.
*Feel free to repeat this step as much as you'd like to achieve the desired effect and pigment. It is very important to be SURE each layer is COMPLETELY DRY before adding another. If it's not, it will likely smear and ruin the entire look.
*Next: Apply the top coat to seal and protect the color from wear and chipping. The sponging effect makes the nails somewhat bumpy so you may want to apply a few layers of top coat to smooth it out.
As you may have already guessed, this is a messy nail polish application. Using the sponge will undoubtedly leave your entire fingertip covered in polish. Simply use a q-tip dipped in nail polish remover to spot-remove excess polish. You can also use a small brush (tiny paint brush or lip or eye liner brush) dipped in nail polish remover to clean up a little more precisely and around the cuticle.
AANNDD! Don't forget to revisit last month's Teaching Thursday post for amazing, quick, INEXPENSIVE tattoo concealing!
No comments:
Post a Comment